Synthetic data is a powerful tool to get Machine Learning practitioners off the ground fast into a working model that can perform the task sufficiently well. In this two series we'll do just that for training Computer Vision model.
We'll pick a concrete real-world object detection task and train a Vision Transformer using synthetically generated image data using Blender, while making sure we are evaluating this model on the real-world target distribution.
Introduction
This is Part 2 of my tutorial series on fine-tuning a Vision Transformer on synthetic data to perform object detection. By this point you should have a synthetically generated train dataset and a real-world validation dataset sitting on your own HuggingFace Hub.
If you don't have these, you can go back to Part 1: Generate data using Blender where you'll be able to prepare your training and validation data.
If you have any questions or comments regarding these tutorials, please let me know at github.com/federicoarenasl/sdg-engine/issues.
Let's dive right in!
Fine-tune DETR using the transformers library
Now that we have both our evaluation and our training datasets somewhere safely in the HuggingFace Hub, we are ready to use them to fine-tune our DEtection TRansformer!
Load the datasets
Both of our datasets now hopefully live in the HF Hub, so pulling them is super simple, we can load our synthetic dataset as train_dataset, from which we'll only use the 'train' split:
Prepare the image embedding model
Next, we'll need to create an image_processor which will take our raw images and embed them into vectors that are consumable by our transformers DETR model.
By starting from a pretrained checkpoint, our image_processor leverages previously learned visual features, allowing the model to focus on adapting to our specific task rather than learning basic image representations from scratch. This typically leads to faster convergence and improved performance.
Augment the data
Data augmentations are a common thing in any ML fine-tuning pipeline, they let us incentivize generalization in our model via data transformations in the training dataset.
Let's introduce transformations in our training dataset to make the model more robust to rotational variations, brightness and contrast variations, noise variations, and other variations in the images:
In the case of our validation dataset, we'll want to keep it as close to the real-world distribution as possible, so we'll only apply transformations that homogenize the input data, like ensuring the max size of the image stays within 500px by 500px size:
Note: When we apply transformations to the images, we need to apply transformations to the annotations as well, otherwise we'd have outdated labels for our transformed images. Hence we set the
bbox_paramsto transform our COCO bounding box annotations stored in our"categories"field.
Now to apply the transformations we'll need a function that takes in any given sample in our HF dataset, goes through all bounding boxes in the sample, applies the transformation, and finally returns the embedded image ready for ingestion:
Finally this function can be mapped to all samples in both dataset via the .with_transform() method, handy from the HF datasets library:
Awesome! We now have our train_dataset_transformed and our val_dataset_transform ready to use during fine-tuning and validation.
Prepare the evaluation metrics
To evaluate our model's performance, we'll use the Mean Average Precision (mAP) metric from TorchMetrics. The evaluation setup requires three functions that work together to process predictions and compute metrics.
The process_batch function converts raw model outputs into a format compatible with TorchMetrics:
Next, aggregate_and_compute calculates overall and per-class metrics:
Finally, we use these two functions in compute_metrics, where we accumulate predictions across batches and compute the final, aggregated metrics at the end of evaluation:
Prepare the fine-tuning run
Initialize logging using Weights and Biases
To track our fine-tuning metrics and visualize results, we'll use Weights & Biases. Set up logging with a unique run identifier:
Prepare the collate function
The collate function combines individual samples into batches for fine-tuning. It ensures all images are properly padded and formatted:
Initialize the model and fine-tuning configuration
With our datasets prepared and evaluation metrics configured, we can now initialize the DETR model and set up the fine-tuning training parameters.
First, load the pretrained DETR model and configure it for our specific object classes:
Next, define the fine-tuning hyperparameters. These values control the learning process, batch sizes, evaluation frequency, and logging:
Our fine-tuning hyperparameter consist of a small learning rate intended to slightly update the weights of our pretrained checkpoint, and L2 regularization to penalize large weights during training.
Furthermore, with these TrainingArguments we set up a training run running for 10000 iterations, saving a checkpoint of the trained weights every 10 iterations, running evaluation every 100 iterations, and logging to Weights & Biases every 1 iteration.
Note: These are initial training settings, and hyperparameters set by me. I encourage you to try your own to improve fine-tuning performance!
Fine-tune your model
Now create the Trainer object that orchestrates the fine-tuning loop, combining the model, datasets, and configuration:
Finally, start the fine-tuning process:
The model will be fine-tuned for 10000 iterations, evaluating on the real-world validation set every 100 steps and logging metrics to Weights & Biases.
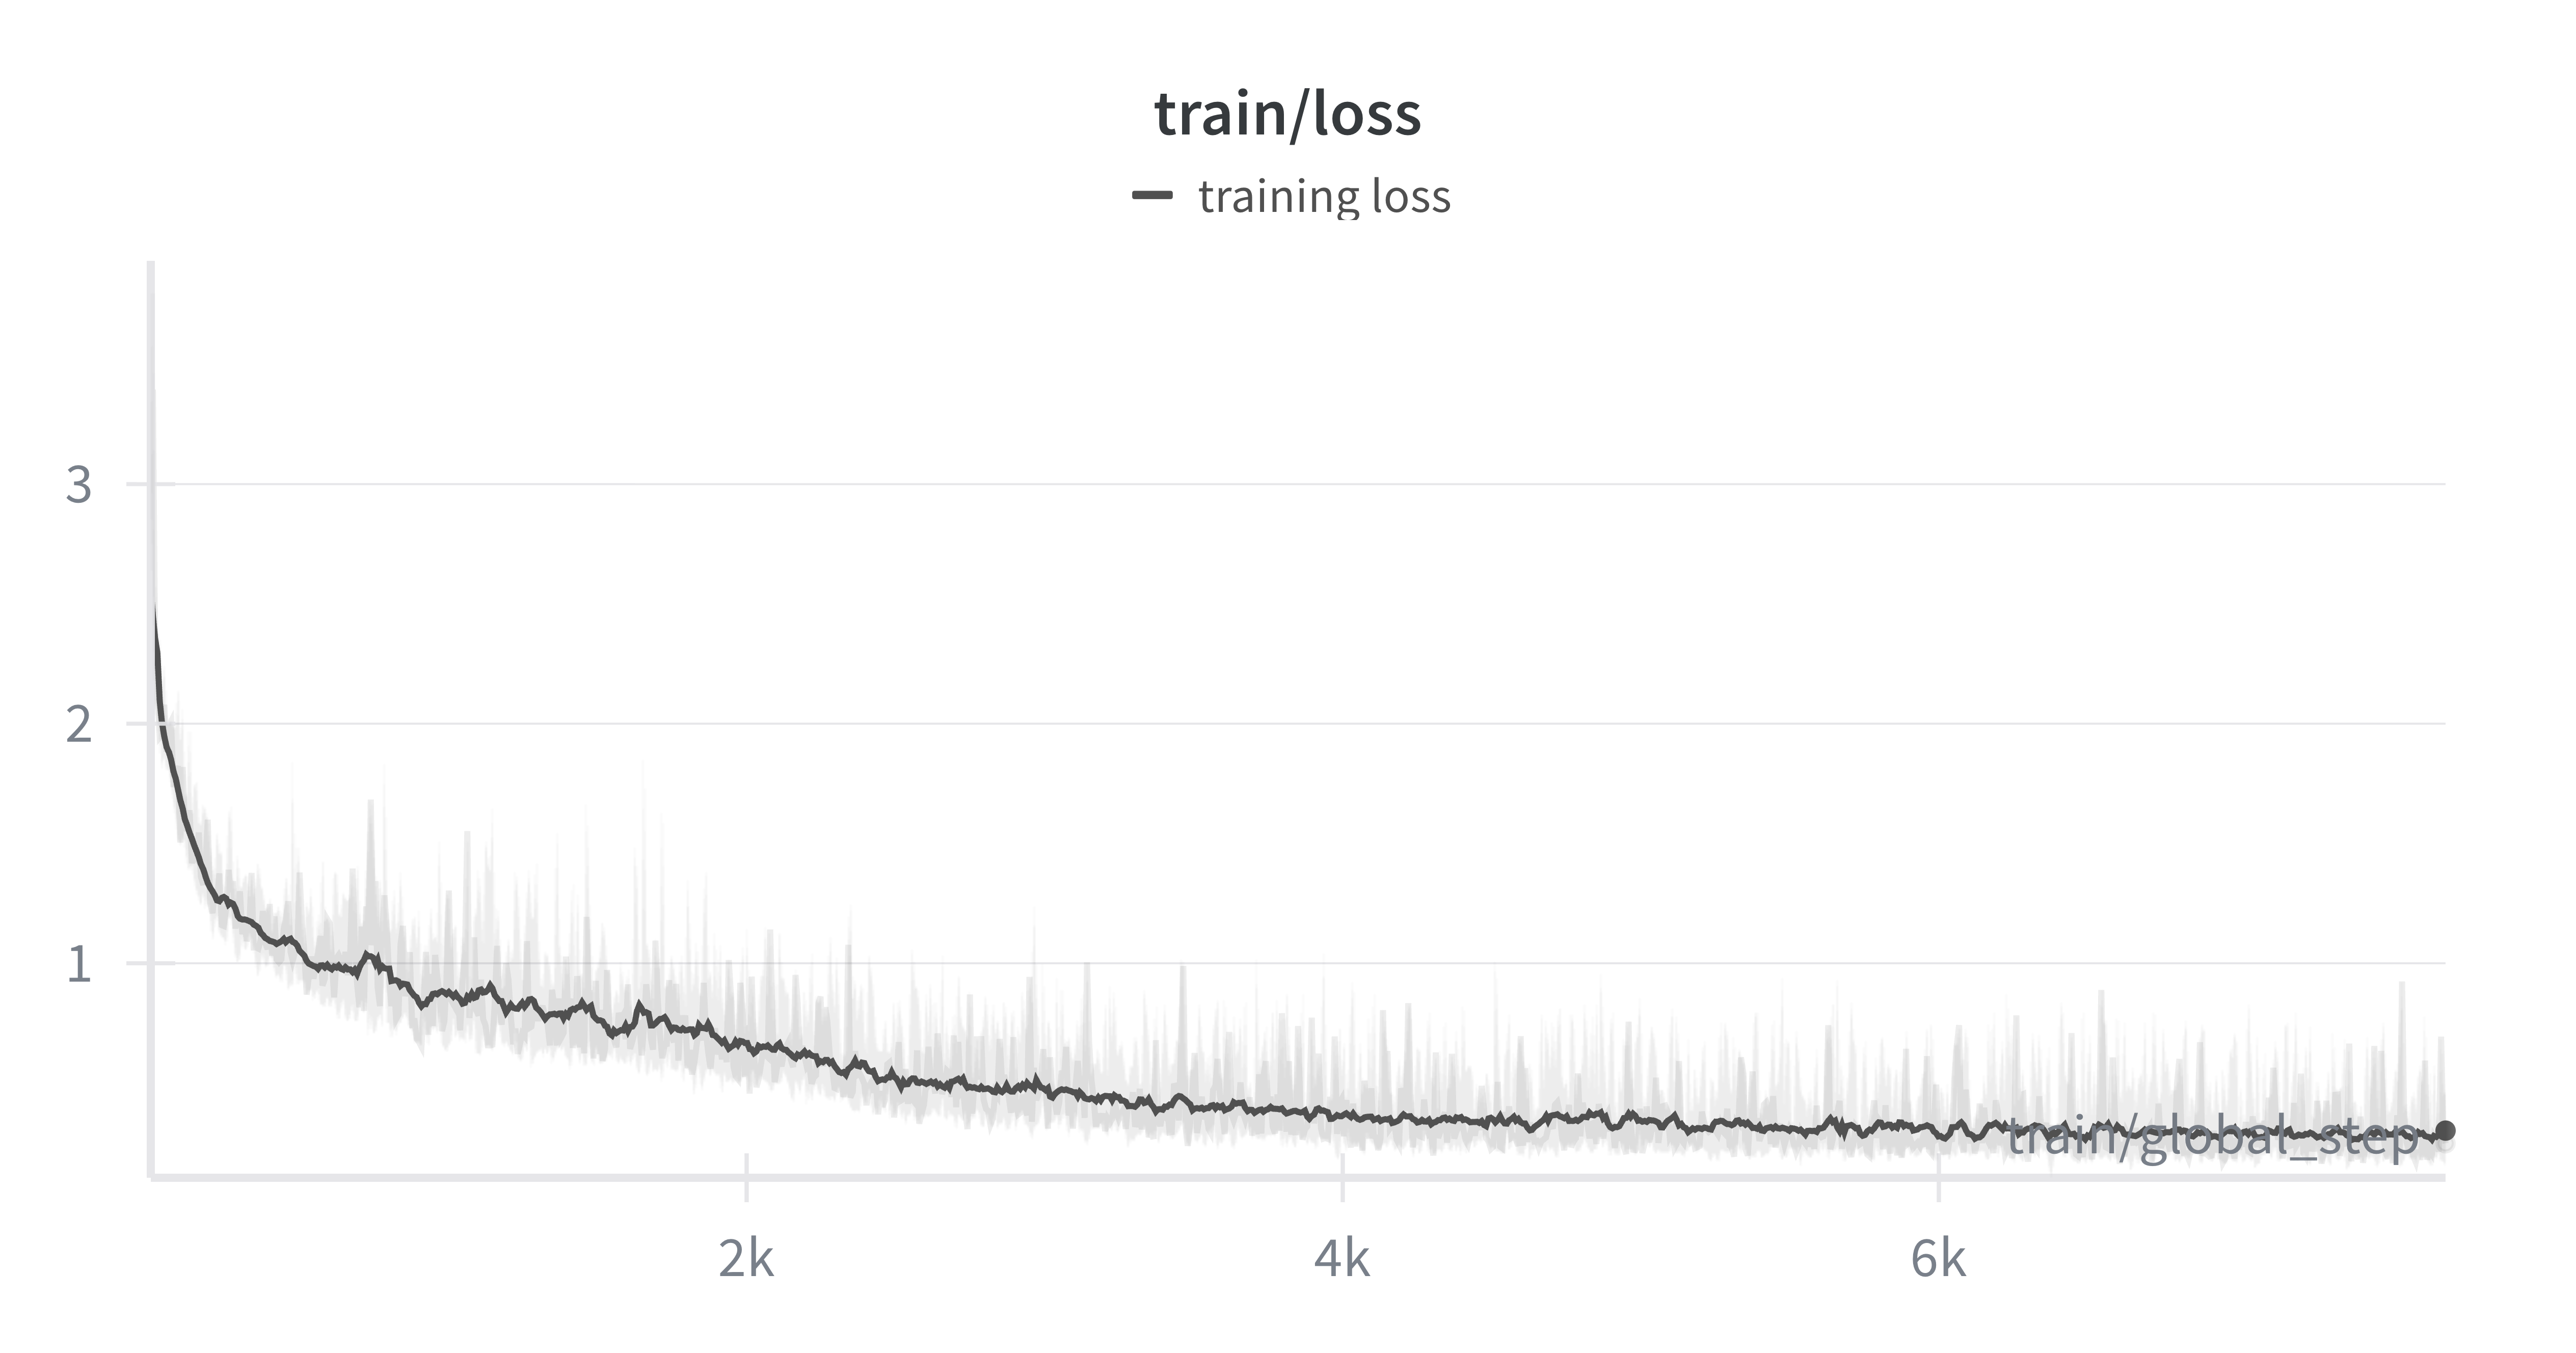
Fine-tuning loss curve showing steady decline over 10,000 steps
Much like the plot above, you should see the training loss showing a steady decline throughout the process, indicating that the model is effectively adapting from the synthetic data. The training loss is looking jumpy, and we might benefit from reducing the learning rate furthermore, or reducing the batch size used to train our model at every iteration.
Evaluation results
Encouragingly, by looking at the evaluation loss calculated against the real-world validation dataset, our evaluation loss shows a steady decline, indicating that our DETR model is able to generalize to a real-world domain, when trained using synthetic data generated with our sdg-engine package.
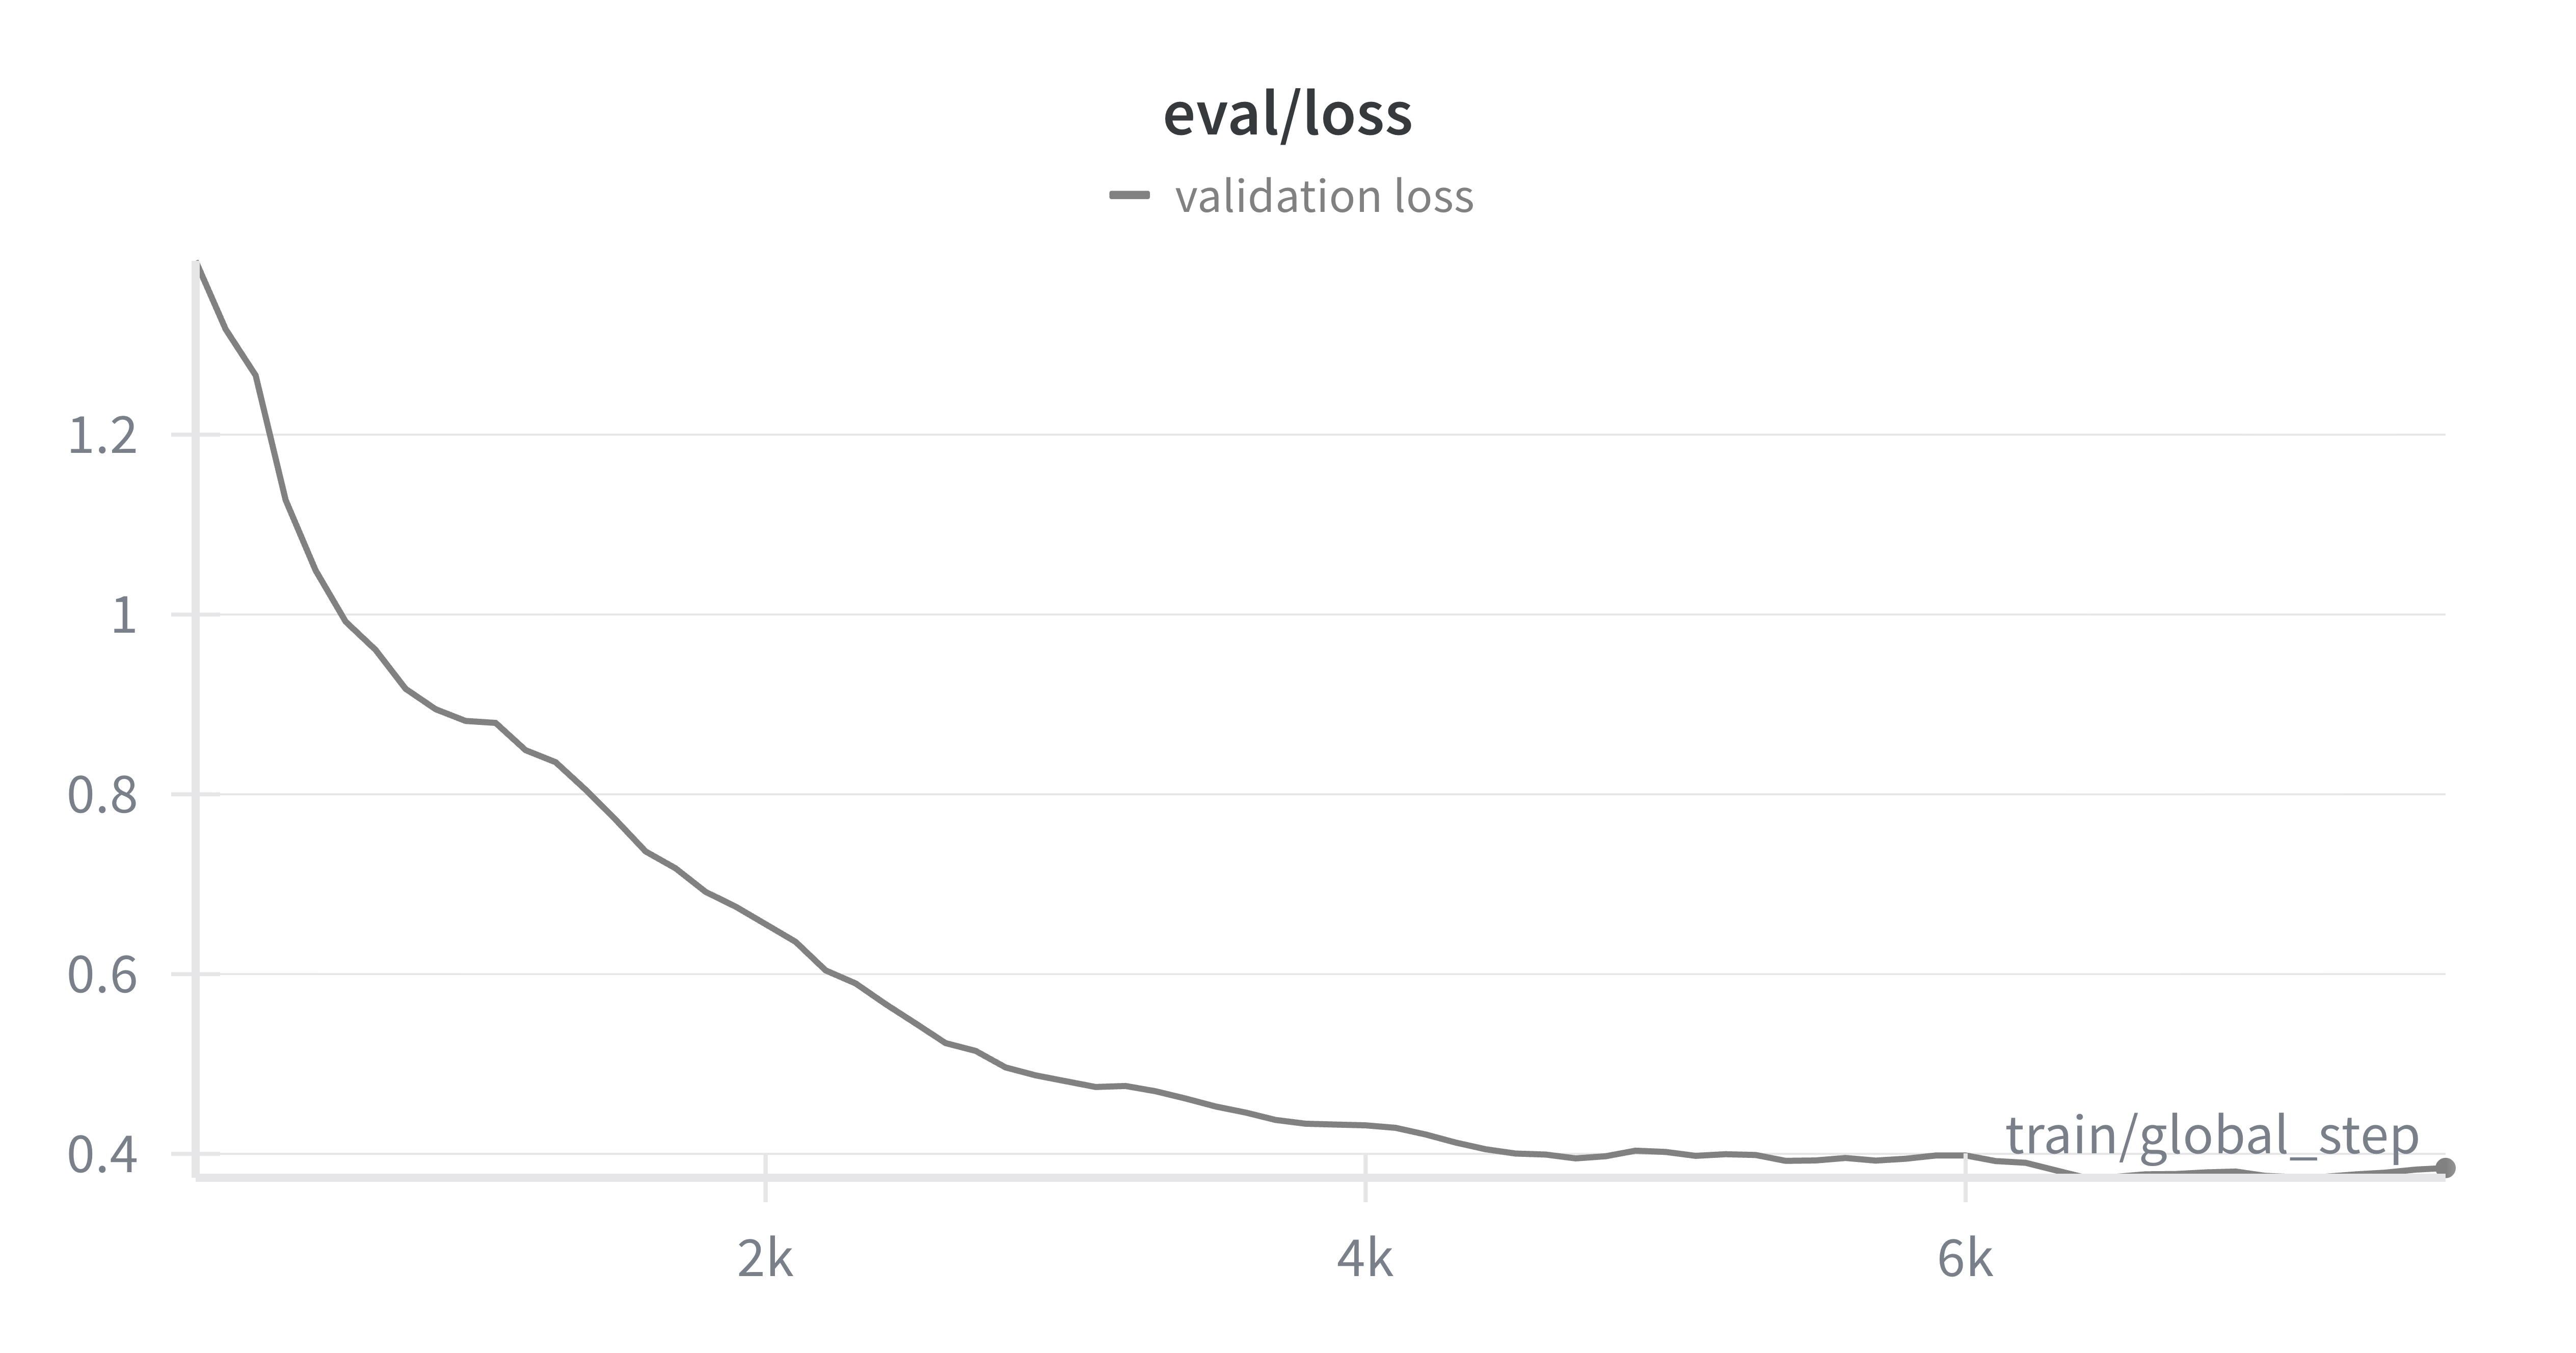
Evaluation loss on real-world validation data
Moreover, by looking at our mean Average Precision (mAP) we are able to see how well the model is doing at correctly predicting the correct classes across our entire validation dataset.
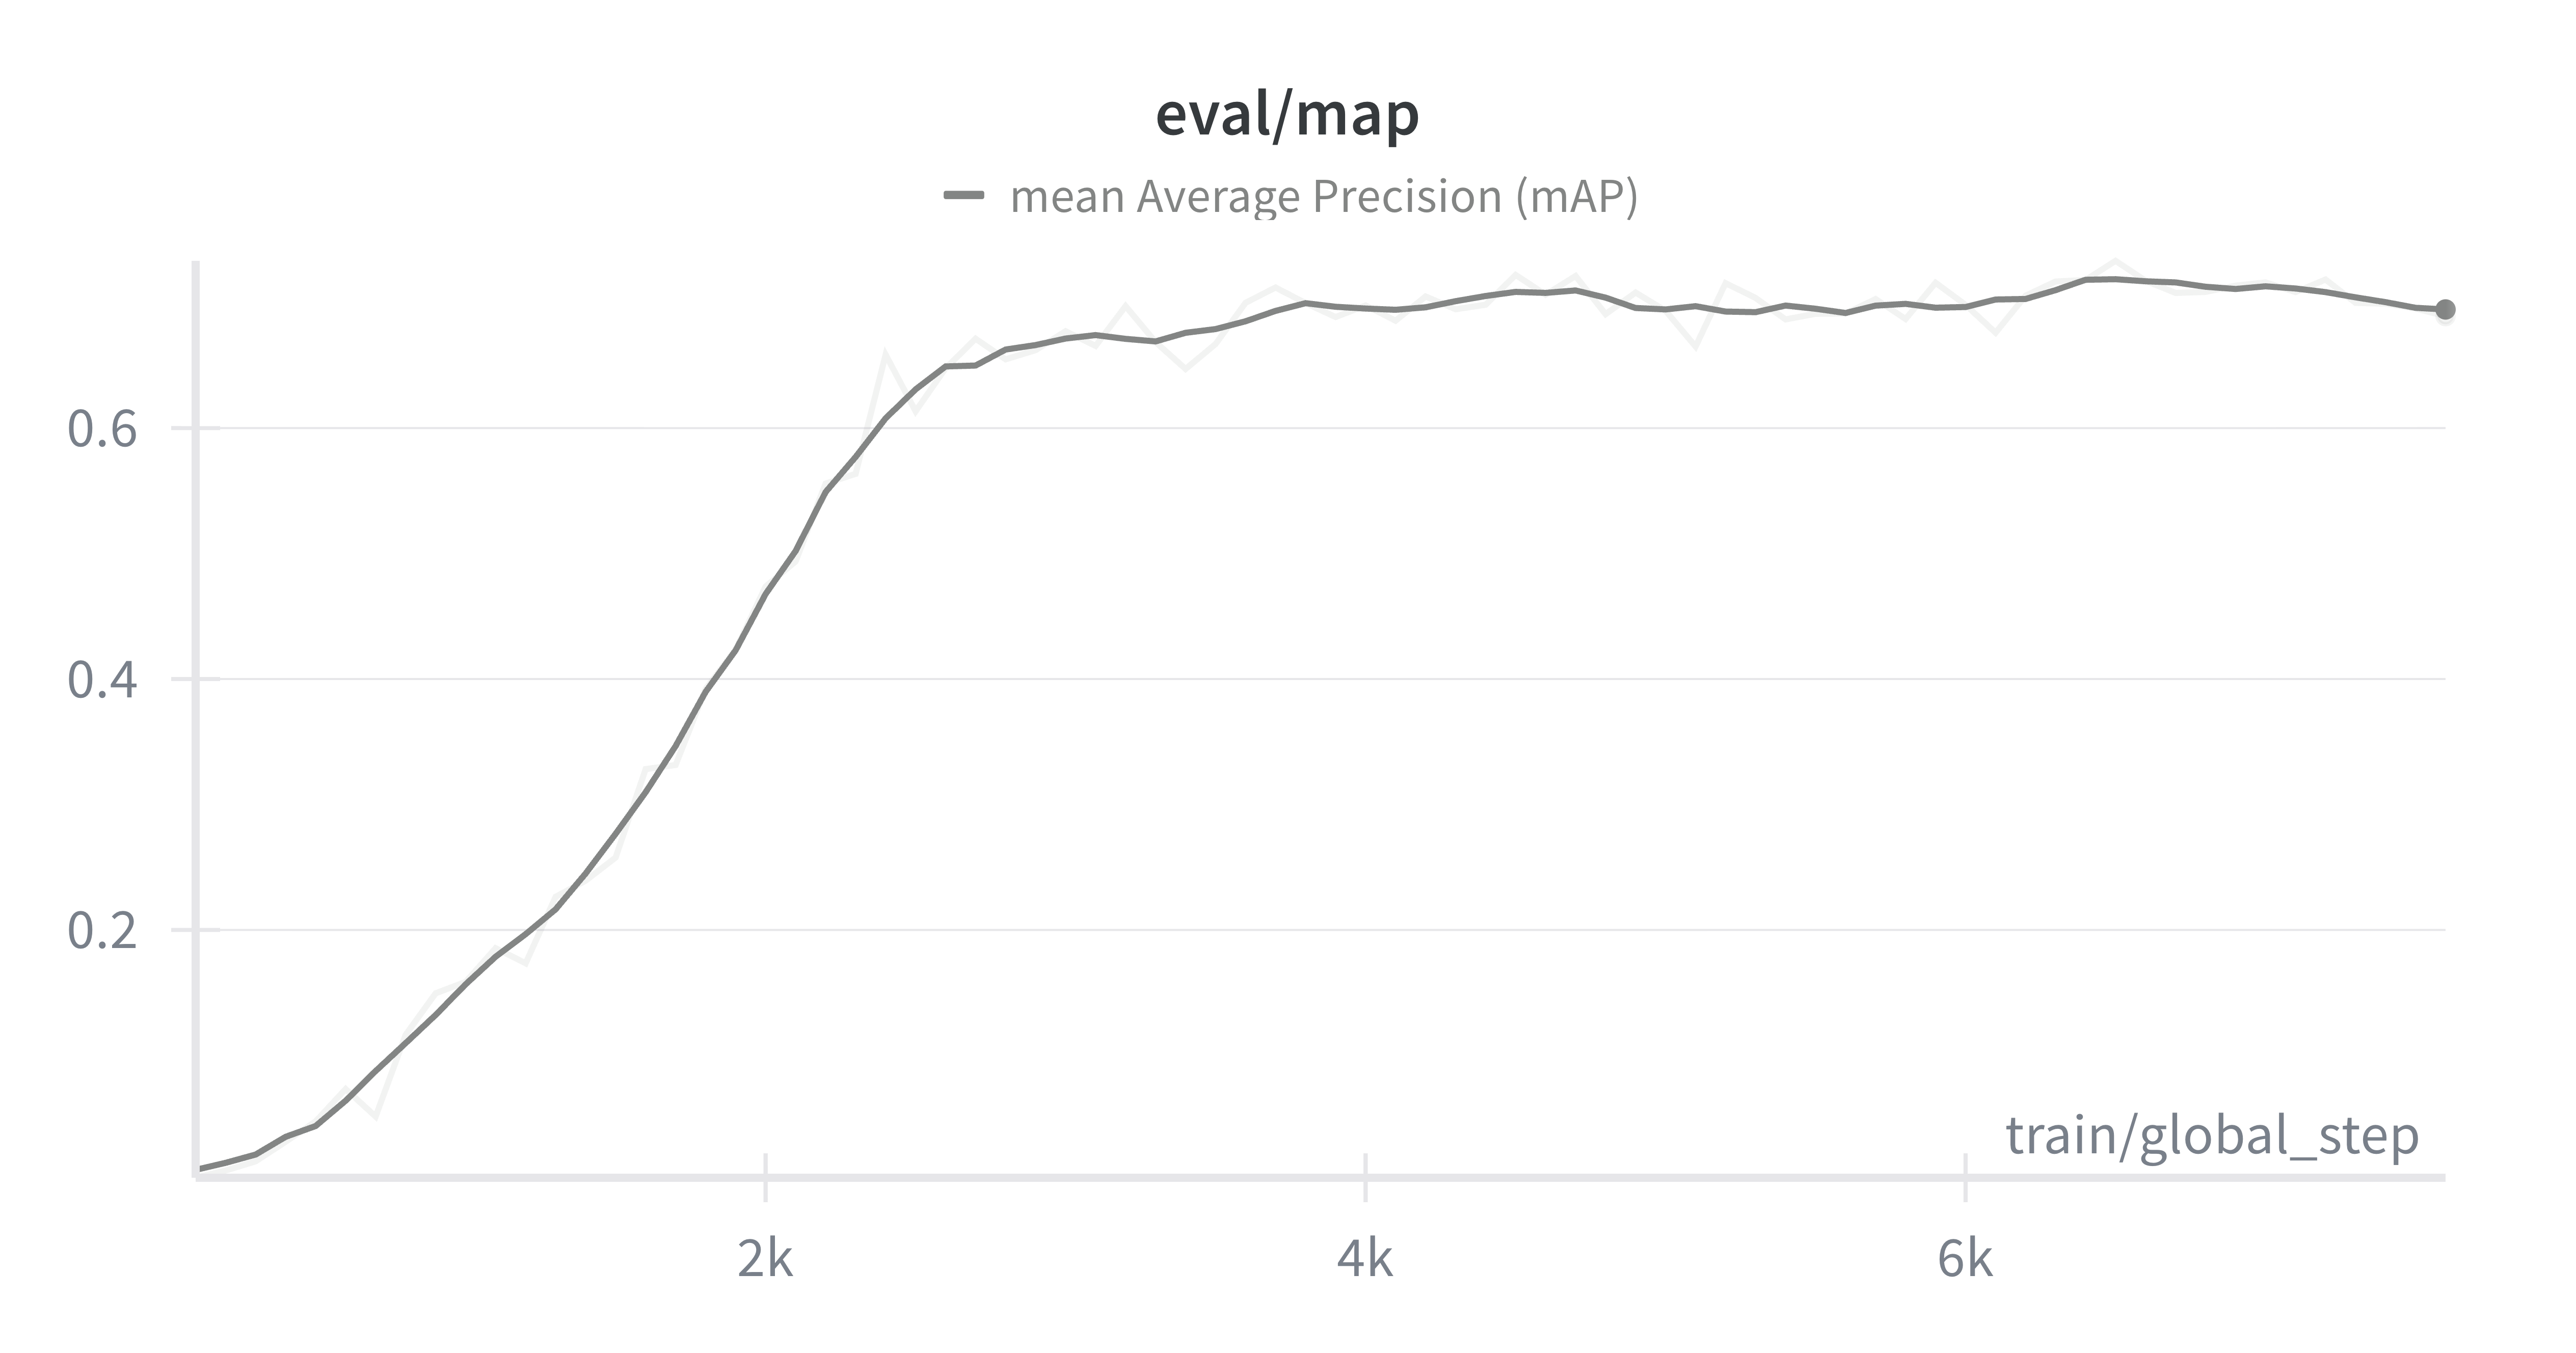
Mean Average Precision (mAP) metric progression during fine-tuning
Even though we see a steady improvement, the model's performance saturates at close to mAP=0.67, this is enough to demonstrate that our model is able to generalize to a real-world dataset, but well below a production-ready model that can be used reliably.
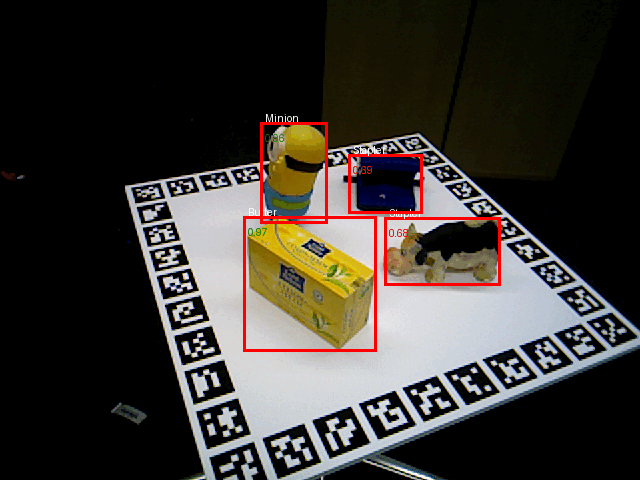
Fine-tuned DETR model detecting objects in the Homebrew dataset
From the qualitative results above, we see that our model is able to detect the Minion and the Butter quite well, but struggles with the Toy Cow and the Stapler! From further investigation, this is clearly reflected in our model's mean Average Precision for each individual object.
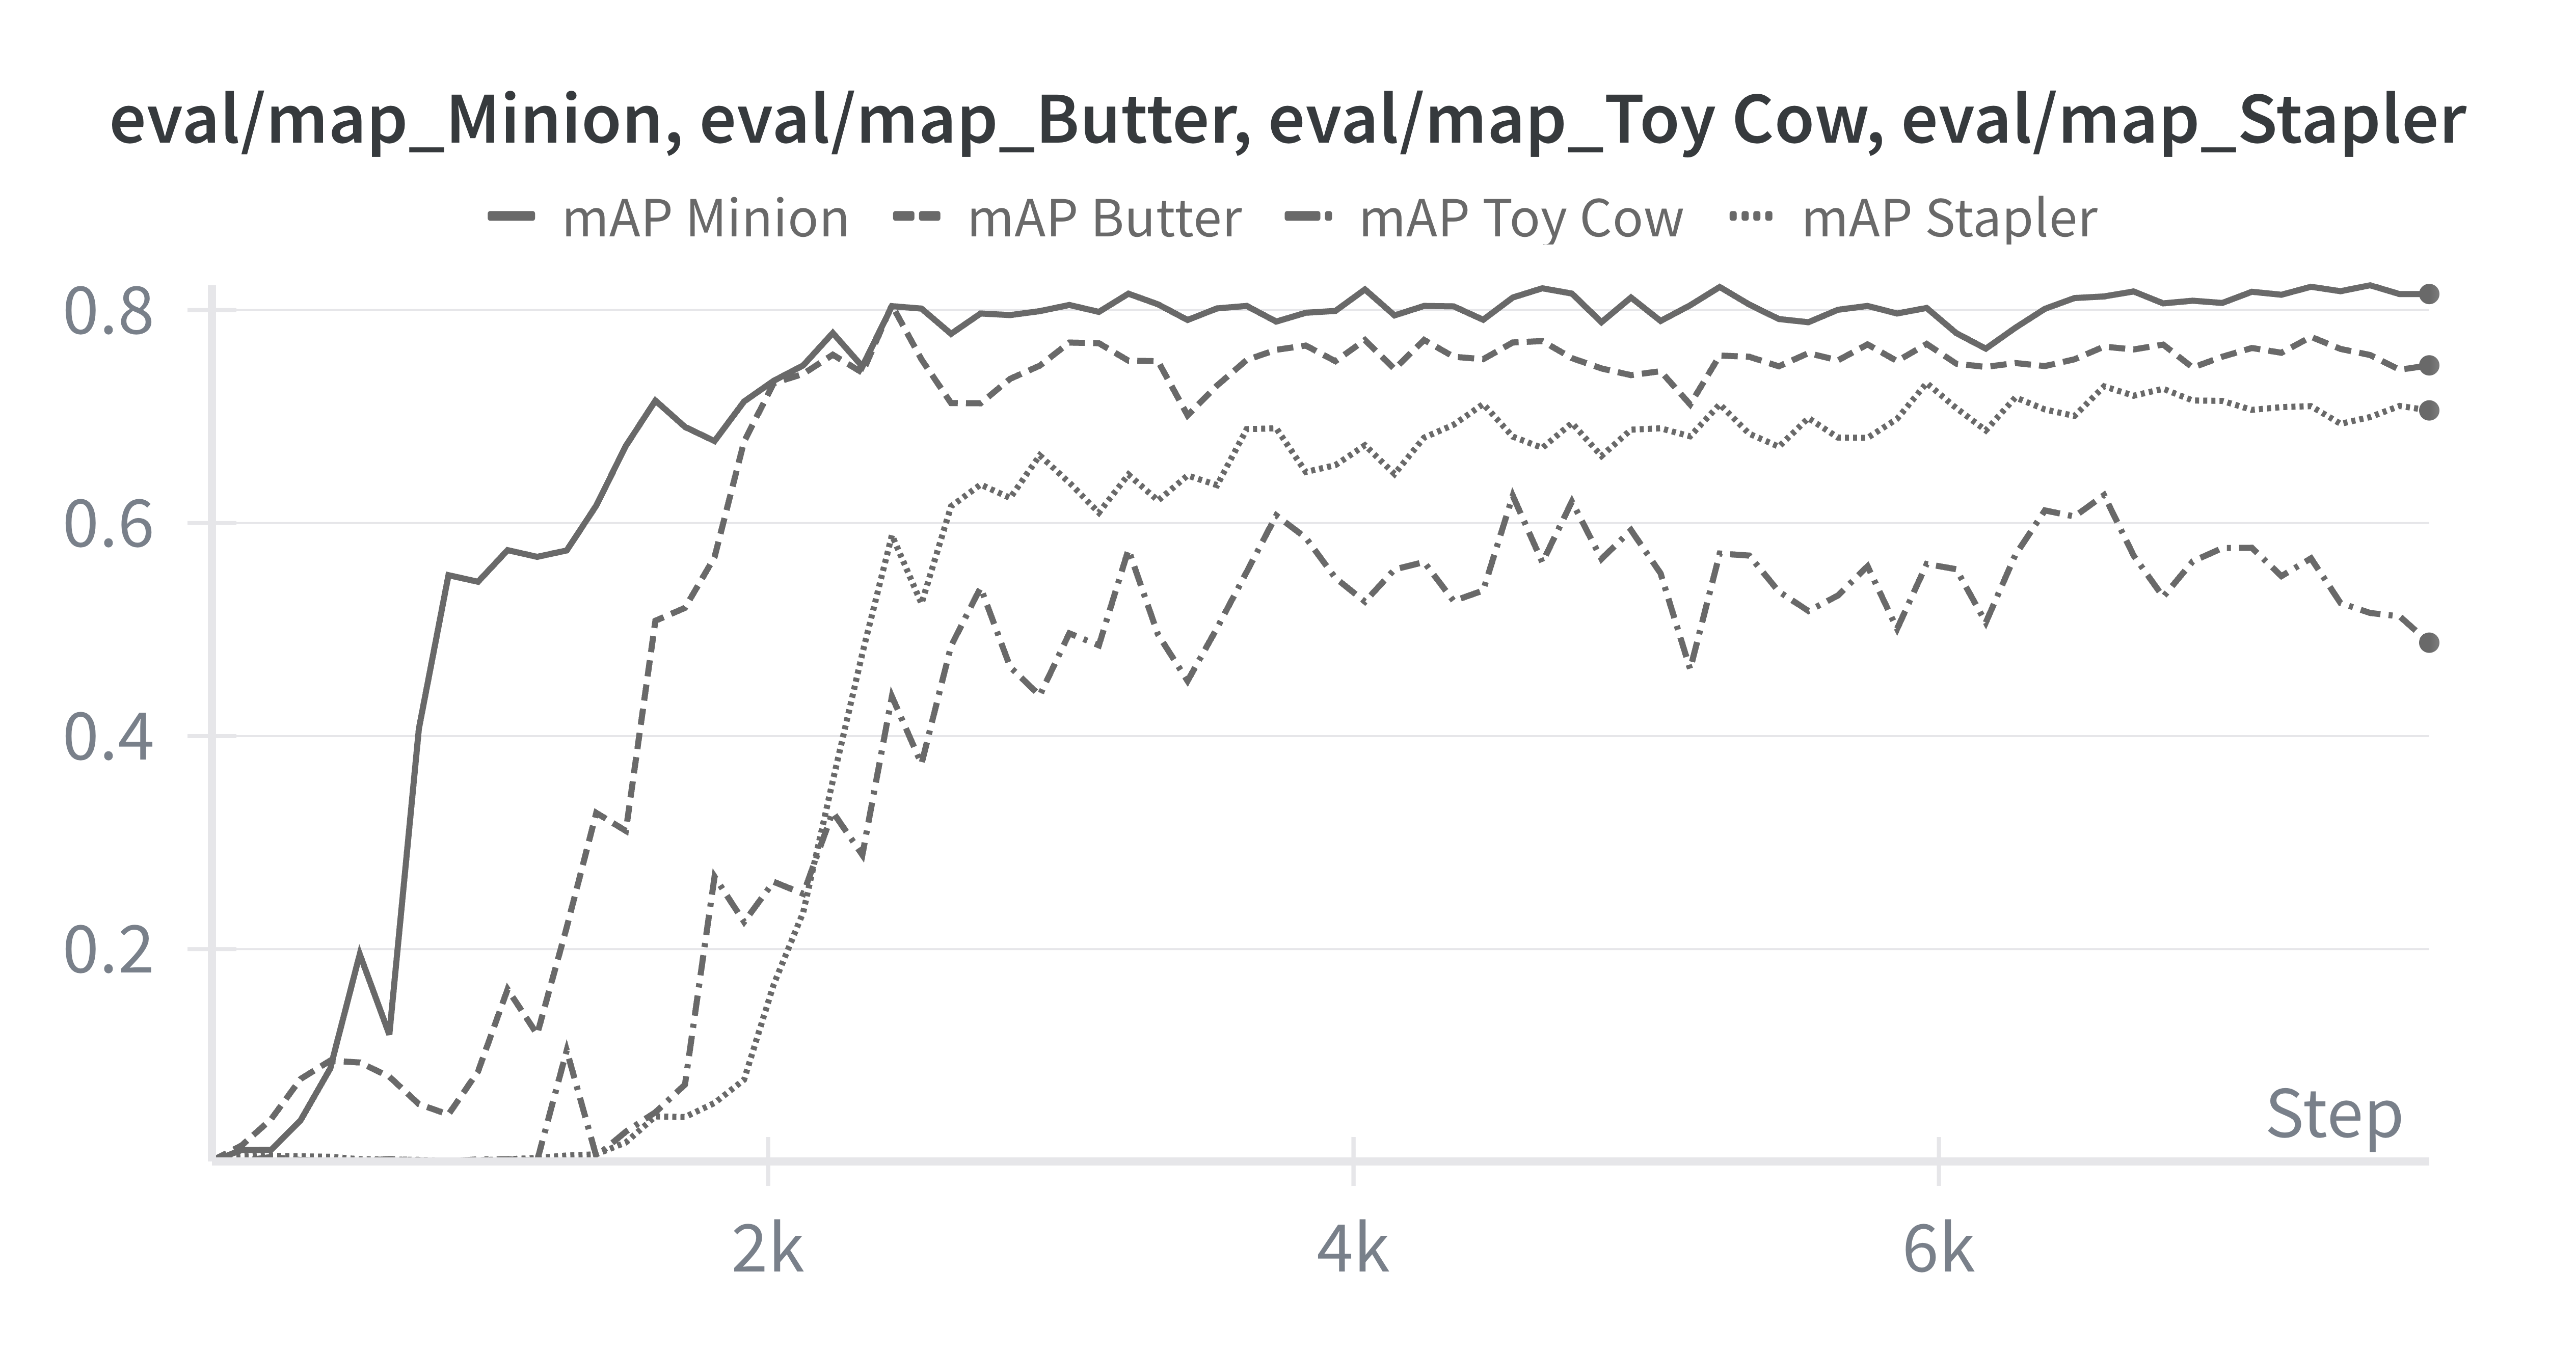
Our trained model's mAP across each of the classes
Clearly our model's struggling with the Toy Cow and the Stapler, a key area for improvement. When improving our model's performance, we can focus on improving performance on these two classes with a few strategies in mind; either (1) upsampling data from these underperforming classes, (2) generating more diverse data containing both of these objects, or by (3) improving the rendering quality of both of these classes directly in Blender.
Conclusions
Synthetic data is a powerful tool to get Machine Learning practitioners off the ground fast into a working model that can perform the task sufficiently well. In this two series tutorial we did just that. We went from a concrete real-world task we wanted to train a Vision Transformer on, to generating the data to train this model, while making sure we were evaluating this model on the real-world target distribution.
We used my own package sdg-engine to facilitate the synthetic data generation process using Blender, and we use the HuggingFace datasets and transformers libraries to facilitate the dataset management process, and the fine-tuning process of a DETR model, a specialized transformer designed specifically for object detection.
Finally, we monitored training and evaluation performance using Weights & Biases, and concluded with a class-based error analysis identifying key areas of improvement. I encourage you to outperform my base model and share the strategies you followed to improve mean Average Precision!